Cloud Integration
You can run NVTabular on the cloud using:
Amazon Web Services
Amazon Web Services (AWS) offers EC2 instances with NVIDIA GPU support. NVTabular can be used with 1x, 4x, or 8x GPU instances or multiple nodes. We’re using an EC2 instance with 8x NVIDIA A100 GPUs to demonstrate the steps below. Check out the $/h for this instance type and adjust the type.
To run NVTabular on the cloud using AWS, do the following:
Start the AWS EC2 instance with the NVIDIA Deep Learning AMI image using the aws-cli.
# Starts the P4D instance with 8x NVIDIA A100 GPUs (take a look at the $/h for this instance type before using them)
aws ec2 run-instances --image-id ami-04c0416d6bd8e4b1f --count 1 --instance-type p4d.24xlarge --key-name <MyKeyPair> --security-groups <my-sg>
SSH into the machine.
Create a RAID volume by running the following command:
Depending on the EC2 instance, the machine may include local disk storage. We can optimize the performance by creating a RAID volume. Based on our experience, two NVMe volumes yield the best performance.
sudo mdadm --create --verbose /dev/md0 --level=0 --name=MY_RAID --raid-devices=2 /dev/nvme1n1 /dev/nvme2n1

sudo mkfs.ext4 -L MY_RAID /dev/md0
sudo mkdir -p /mnt/raid
sudo mount LABEL=MY_RAID /mnt/raid

sudo chmod -R 777 /mnt/raid

# Copy dataset inside raid directory:
cp -r data/ /mnt/raid/data/
Launch the NVTabular Docker container by running the following command:
docker run --gpus all --rm -it -p 8888:8888 -p 8797:8787 -p 8796:8786 --ipc=host --cap-add SYS_PTRACE -v /mnt/raid:/raid nvcr.io/nvidia/nvtabular:0.3 /bin/bash
Start the jupyter-lab server by running the following command:
jupyter-lab --allow-root --ip='0.0.0.0' --NotebookApp.token='<password>'
Google Cloud Platform
The Google Cloud Platform (GCP) offers Compute Engine instances with NVIDIA GPU support. We’re using a VM with 8x NVIDIA A100 GPUs and eight local SSD-NVMe devices configured as RAID 0 to demonstrate the steps below.
To run NVTabular on the cloud using GCP, do the following:
Configure and create the VM as follows:
GPU: 8xA100 (a2-highgpu-8g)
Boot Disk: Ubuntu version 18.04
Storage: Local 8xSSD-NVMe
Install the appropriate NVIDIA drivers and CUDA by running the following commands:
curl -O https://developer.download.nvidia.com/compute/cuda/repos/ubuntu1804/x86_64/cuda-ubuntu1804.pin
sudo mv cuda-ubuntu1804.pin /etc/apt/preferences.d/cuda-repository-pin-600
sudo apt-key adv --fetch-keys https://developer.download.nvidia.com/compute/cuda/repos/ubuntu1804/x86_64/7fa2af80.pub
sudo add-apt-repository "deb https://developer.download.nvidia.com/compute/cuda/repos/ubuntu1804/x86_64/ /"
sudo apt -y update
sudo apt -y install cuda
nvidia-smi # Check installation
Install Docker by running the following commands:
distribution=$(. /etc/os-release;echo $ID$VERSION_ID) \
   && curl -s -L https://nvidia-merlin.github.io/nvidia-docker/gpgkey | sudo apt-key add - \
   && curl -s -L https://nvidia-merlin.github.io/nvidia-docker/$distribution/nvidia-docker.list | sudo tee /etc/apt/sources.list.d/nvidia-docker.list
sudo apt-get -y update
sudo apt-get install -y nvidia-docker2
sudo systemctl restart docker
sudo docker run --rm --gpus all nvidia/cuda:11.0-base nvidia-smi # Check Installation
Configure the storage as RAID 0 by running the following commands:
sudo mdadm --create --verbose /dev/md0 --level=0 --name=MY_RAID --raid-devices=2 /dev/nvme0n1 /dev/nvme0n2
sudo mkfs.ext4 -L MY_RAID /dev/md0
sudo mkdir -p /mnt/raid
sudo mount LABEL=MY_RAID /mnt/raid
sudo chmod -R 777 /mnt/raid

# Copy data to RAID
cp -r data/ /mnt/raid/data/
Run the container by running the following command:
docker run --gpus all --rm -it -p 8888:8888 -p 8797:8787 -p 8796:8786 --ipc=host --cap-add SYS_PTRACE -v /mnt/raid:/raid nvcr.io/nvidia/nvtabular:0.3 /bin/bash
Databricks
Databricks has developed a web-based platform on top of Apache Spark to provide automated cluster management. Databricks currently supports custom containers
To run NVTabular on Databricks, do the following:
Create a custom NVTabular container using Databricks runtime.
NOTE: If any of the default dependencies that come with the Databricks cluster are changed to a different version, the Databricks cluster won’t be able to detect the Spark driver. As a workaround, the NVIDIA RAPIDS team has created a Docker container so that RAPIDS can run inside a Databricks cluster.
Extend the container and add NVTabular and PyTorch so that they can run inside Databricks.
Select the appropriate version of the NVTabular Conda repo.
NOTE: All versions of the NVTabular conda repo are listed here.
Clone the cloud-ml-example repo by running the following command:
git clone https://github.com/rapidsai/cloud-ml-examples.git
Add the selected version of the NVTabular Conda repo to the rapids-spec.txt file by running the following command:
cd databricks
echo "https://conda.anaconda.org/nvidia/linux-64/nvtabular-0.6.1-py38_0.tar.bz2" >> docker/rapids-spec.txt
To install PyTorch, add the fastai pip package install to the Dockerfile by running the following command:
RUN pip install fastai
Build the container and push it to Docker Hub or the AWS Elastic Container Registry by running the following command:
docker build --tag <repo_name>/databricks_nvtabular:latest docker push <repo_name>/databricks_nvtabular:latest
Use the custom container to spin up the Databricks cluster.
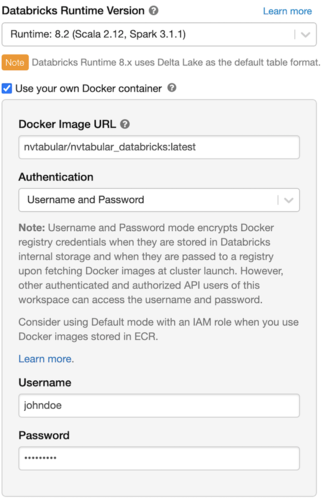
Select a GPU node for the Worker and Driver. Once the Databricks cluster is up, NVTabular will be running inside of it.